Inbound AI Agent – Configuring an Agent Using a Template
In this guide, you’ll learn how to create a new AI Promonet Inbound AI Agent using a pre-made template. By following these steps, you can efficiently set up your agent to handle inbound calls tailored to your specific needs.
In AI Promonet you can create inbound and outbound voice AI Agents. Depending an your specific needs and requirements you can create an agent from template or you can use a ready-made template to give you a head start.
In this article, you will learn how to create a new AI Promonet Inbound AI Agent using a pre-made template.
Initial Steps to Create an AI Promonet Inbound AI Agent
1. Access AI Promonet Workspace
- Navigate to your AI Promonet Workspace by selecting the desired workspace.
2. Navigate to the Agents Tab
- Click on the Agents tab located on the left side of the page.
- Click the blue “+” button to start creating a new agent.
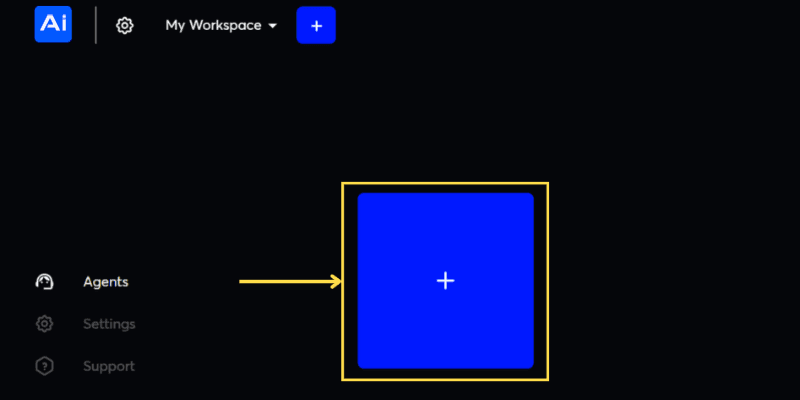
3. Select Agent Type
- Choose Inbound Agent in the Agent Type options.
- Select the desired template to start with a pre-made configuration.
4. Save and Continue
- Click Save and Continue to proceed to the Agent Configuration step.
Step 1: Agent Configuration
After selecting a template, some fields may be pre-filled. Ensure all required fields are completed and adjust any pre-filled information as necessary.
Required Fields
- Agent Avatar
- Upload a picture to represent your agent. Accepted formats are .png and .jpg.
- Name
- Enter the name your assistant will go by.
- Language
- Select the language your agent will use.
- Voice
- Choose the voice for your agent.
- Phone Number
- Select the Twilio phone number your agent will use.
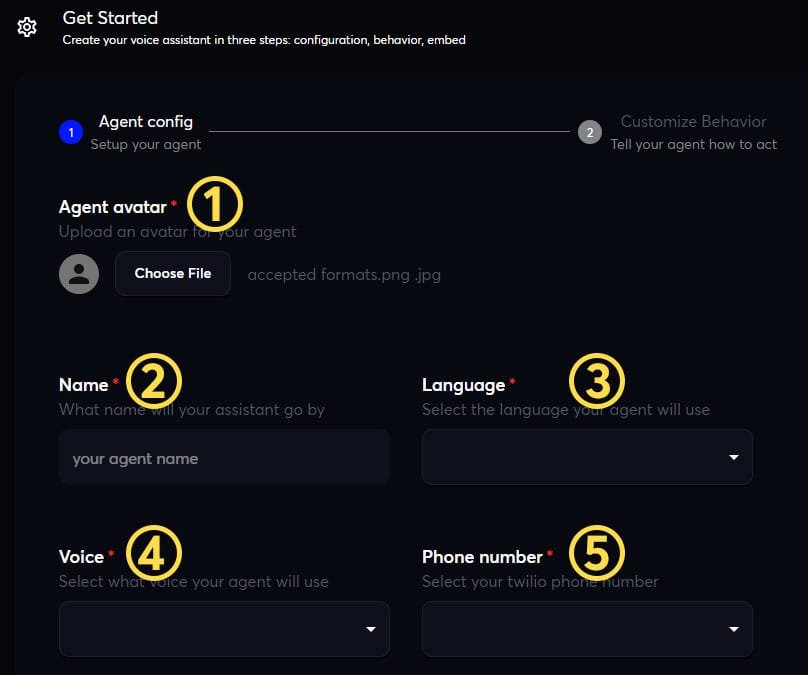
Good to know: A single phone number can be used for only one inbound and one outbound AI Agent. If a number is greyed out, it means that it is already assigned to an inbound AI Agent.
Optional Settings
- Welcome Message
- Toggle On/Off.
- If turned on, input the welcome message in the textbox. This is the first sentence your agent will use when the call is answered.
- Call Recordings
- Toggle On/Off.
- Record calls for audio playback and review them easily in the transcript logs.
- Voice Mail Detection
- Toggle On/Off.
- If turned on, you have two options:
- Leave a Voice Message: Your agent will leave the message you provide in the textbox.
- Hang Up Call: The call will end once a voice mail is detected.
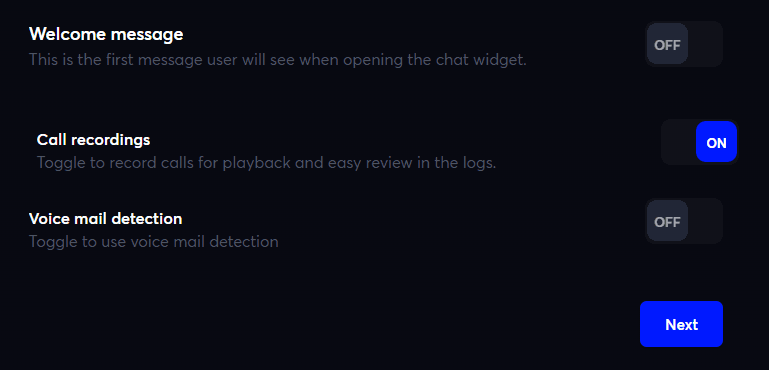
Finish Agent Configuration
- Click the Next button to proceed to the second step: Agent Behavior customization.
By completing these steps, you’ve successfully configured the initial settings for your new AI Promonet Inbound AI Agent using a template. Next, you’ll customize the agent’s behavior to align with your specific requirements.